In today’s software development ecosystem, the need for platform engineering arises to improve the developer experience and productivity without impacting existing tools and technologies. The internal developer portal (IDP) abstracts the infrastructure layer as a self-service which reduces the developer tech stack so that developers can focus more on coding without worrying about how infrastructure is managed and run. You can learn more about platform engineering in the detailed blog post.
Making a platform is a complex process, and one can easily fail at platform engineering. However, there are many platform engineering software including Backstage and Kratix to streamline the process. In this blog post, we will explore one of the internal developer portals – Port – and learn more about it. We will see how you can leverage Port to create no-code IDP in a short duration, and will also see basic building blocks, integrations, extensibility, and some use cases around Port.
What is Internal Developer Portal (IDP)?
Internal Developer Portal is a centralized hub for developers to manage software development lifecycles. It connects all the unorganized tools such as CI/CD, IaC, and container orchestration and allows developers to utilize these tools in their day-to-day routine via simple Web UI or CLI.
As we know now what IDP is, let’s move to the IDP in focus - Port.
What is Port?
Port is a SaaS product that enables organizations to build no-code internal developer portals. Port comes with quick start templates so you can get started quickly. It also supports bringing your own (BYO) data model to make custom IDP. The core components of Port include:
Software Catalog
Self-Service
Scorecards
Workflow Automation
RBAC
1. Software Catalog
A software catalog acts as a central graph that collects siloed data from different data sources and reflects it in a visualized form. It is a wrapper for entities such as microservices, environments, packages, clusters, databases, etc, and the relationship between them. Each entity in the Port is represented as a blueprint. We will discuss more about it later in the blog post.
2. Self-Service
In day-to-day life, developers need to perform certain repetitive tasks such as spinning up an ephemeral environment, performing day 2 actions, scaffolding a service, etc. To perform these tasks, developers may not be familiar with the infrastructure side or don’t have all the required permissions and have to ask for DevOps people to perform these tasks either via raising a ticket or an email. The developer’s self-service of IDP can bridge this gap and allow the developer to perform these repetitive actions via a simple input form. In Port, after successfully creating and onboarding the resources in the software catalog, developers can perform actions on the ingested resources from scaffolding to day-2 operations with an intuitive and simple input user form. Port also supports long-running actions e.g., provisioning an ephemeral environment. The self-service actions are stateful, which means even a single change will be reflected in the software catalog.
3. Scorecards
Standardization is the core principle for the internal developer platform and scorecards in Port help you to set those standards, metrics, and KPIs. To understand what Scorecards are, and how they can help you set up the standards, let’s take an example of an application readiness check. For instance, the platform team created a standard that the deployment replica count should be set to a minimum of 3 replicas in the prod environment. By mistake or lack of knowledge, the developer set it to 1 replica. Here, a scorecard can help you to keep track of it and let the developer know about it via message in IDP UI. Scorecards can also be used in workflow automation as well as in setting up quality engineering standards.
4. Workflow automation
Workflow automation is a feature in IDP mainly used by the DevOps/SRE/Infrastructure teams to automate machine-driven workflows. Using this feature, the system can decide when to start or stop the workflow. The software catalog plays an important role in making these decisions as it contains all the resources and their current states. We can use Port API or events to trigger the automation. One of the use cases for this could be removing ephemeral environments after the expiration of TTL.
5. RBAC (Role-Based Access Control)
Once all the required data is ingested into the software catalog we have loads of data and plenty of options in self-service for ingested resources. Here RBAC comes into the picture to verify the authentication and authorization of the users. It also supports SSO. Using RBAC granular policies, we can control the use of self-service action and populate only relevant resources to the user.
Integrations with Port
Port provides a rich set of out-of-the-box integrations. For instance, to integrate with Kubernetes, Port provides the Kubernetes exporter which is responsible for ingesting the live data from the Kubernetes cluster. There is also a liberty to create own integrations as per requirements using open source solution Ocean created by Port or use other integration methods offered by Port e.g., Webhooks. You can check the full list of out-of-the-box Port integrations.
Use-cases
As we have covered the basics of Port, let’s discuss some common use-cases for Port to understand it better.
Kubernetes and Argo CD
Ephemeral environments
IaC for developers
1. Kubernetes and Argo CD
Port provides options to visualize and manage Kubernetes and Argo CD resources. Using a software catalog we can visualize the different Kubernetes resources with the current state as it offers live synchronization with Kubernetes clusters. Kubernetes self-service actions of Port provide the ability to developers to directly interact with Kubernetes resources so that they can change the resource limits or requests, and modify the replica count.
2. Ephemeral environments
Ephemeral environments provide robust, on-demand platforms for running tests, previewing features, and collaborating asynchronously across teams. Port provides smooth control over environments from creating the environment with one click to destroying it after the TTL. One can use Scorecards and workflow automation to destroy the environment after TTL has expired, which automates the entire process of creating and destroying ephemeral environments.
3. IaC for developers
Developer’s self-service not only standardized the cloud automation but also saved time and costs. Port allows platform engineers to build self-service over IaC so developers can apply through IDP. While writing this blog post, Port supports Terraform and Pulumi. For example, users can create an Amazon S3 bucket or provision the RDS DB right from the Port’s self-service UI without worrying about IaC tooling.
Get started with Port
Port provides a free account to get started, for more pricing information, you can refer to their pricing page. In this post, we are going to create a software catalog for Kubernetes with predefined data models and blueprints. Before creating the software catalog, let’s have a brief introduction about the building blocks of it.
Data model
To begin with, creating an IDP we first need to identify and determine the information which we want to include. This is the place where we define all of the entities and the relationship between them.
There are two main building blocks in setting up the data models:
Blueprints - represent an entity type. Blueprints hold the schema of the entities you wish to represent in the software catalog. For example: a microservice and an environment blueprint.
Relations - allows you to define the dependency model between blueprints. Relations turn Port’s catalog into a graph-oriented catalog. For example: relationship of pod and node.
Software catalog
Let’s get started with creating a software catalog in Port. To create a software catalog, Port provides DevPort Builder UI. The basic building block for software catalog is Blueprint. We can create blueprints using 3 methods i.e. API, IaC (Pulumi, Terraform), or using UI. For this blog, we are going to use UI and predefined blueprint templates for Kubernetes. Also, we need the following prerequisites before getting started.
Prerequisite:
Kubernetes cluster: A target Kubernetes cluster is up and running.
Helm: Helm should be installed on the local machine to install the Kubernetes exporter helm release (we will discuss this in Ingest Data section below).
Port account: To get started, a free Port account is sufficient.
Go to the DevPortal Builder page.
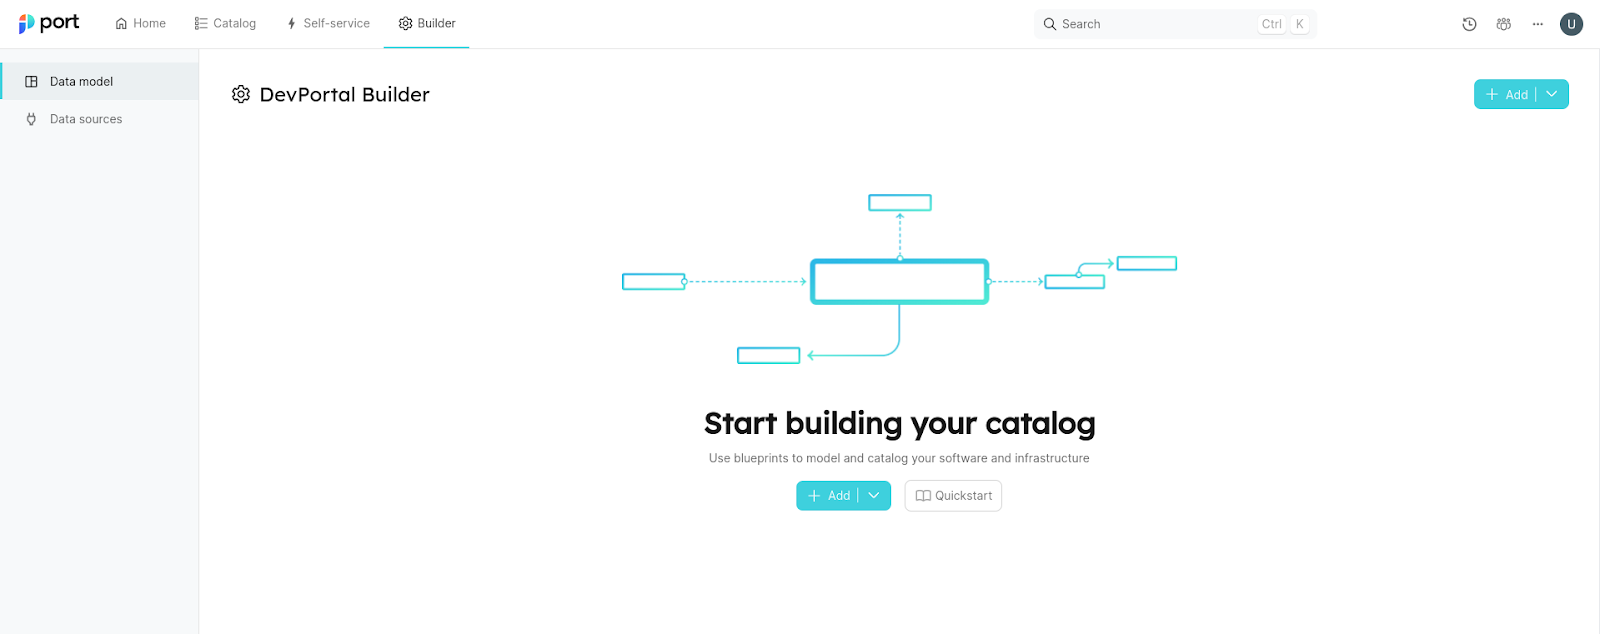
Click on Add at the top right-hand corner.
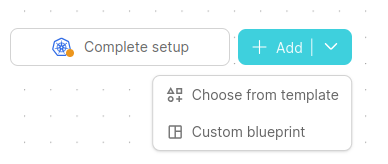
Select Choose from template for predefined Templates.
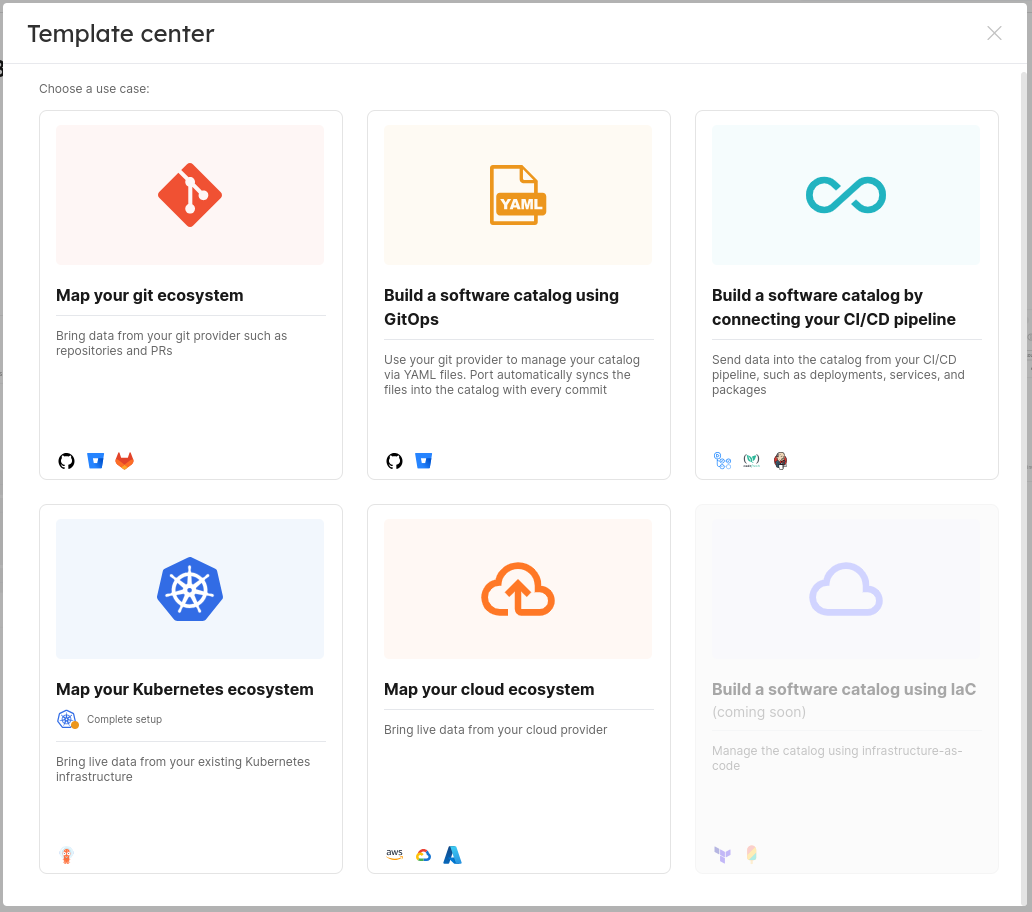
It will open templates you can pick to begin with. Here, click on the Map your Kubernetes ecosystem.
Select if you are using Argo CD or not.
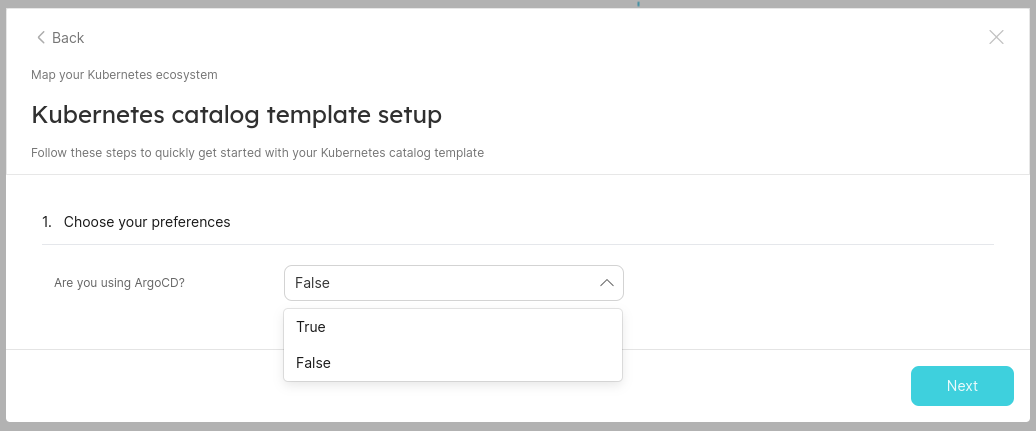
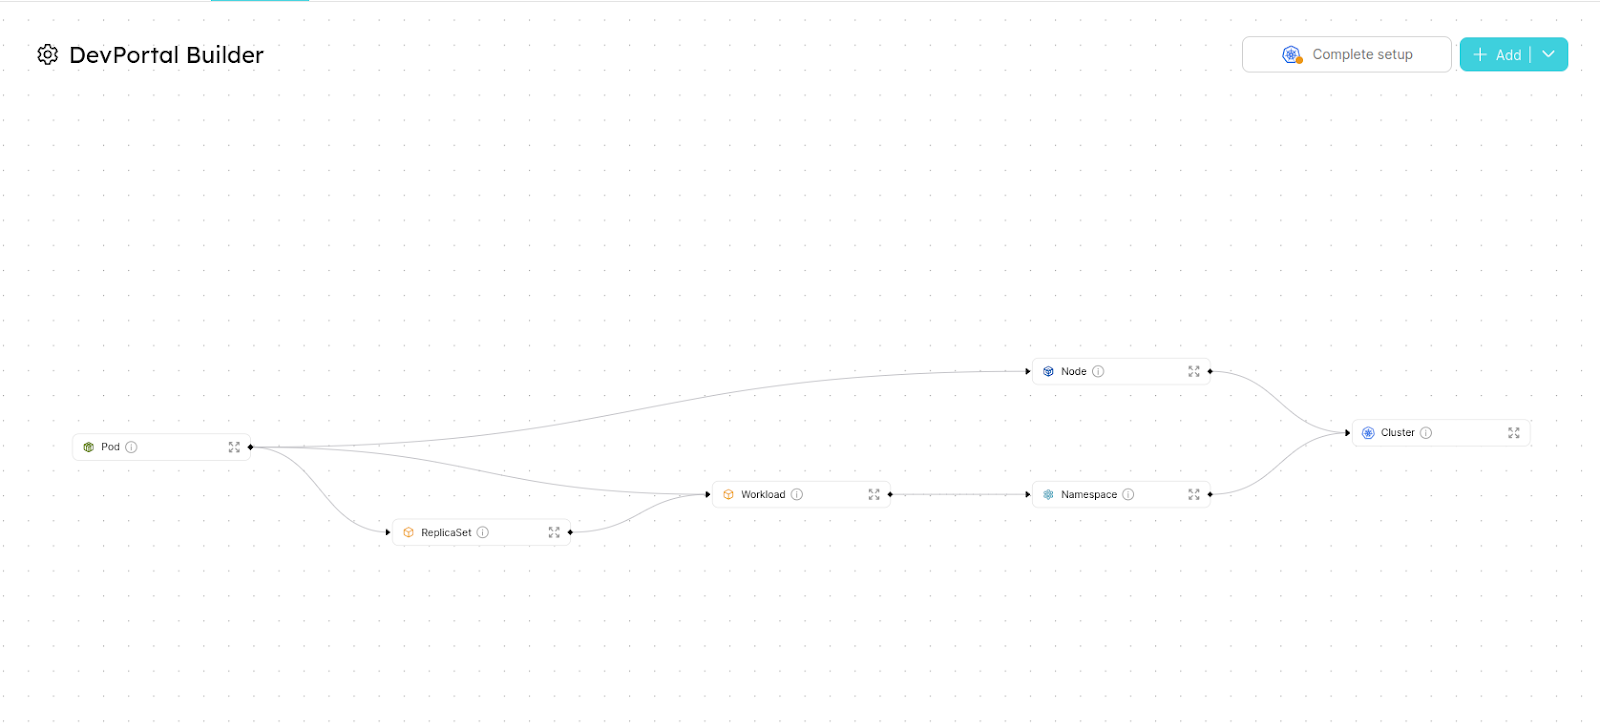
After clicking on Next we will be able to see templates and relations between them in the UI.
Ingest Data:
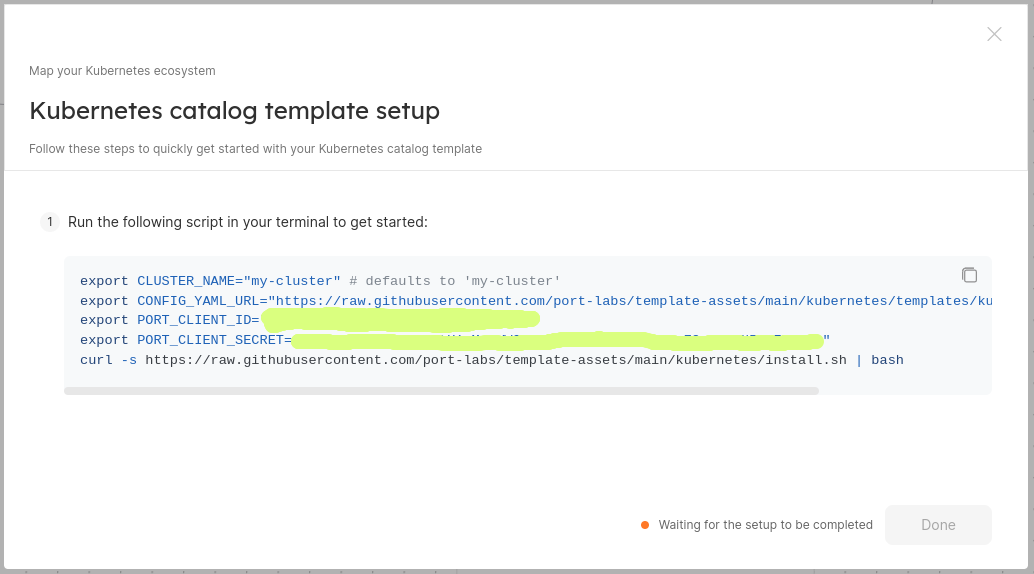
To ingest data from the Kubernetes cluster, Port provides an open-source Port Kubernetes Exporter. The exporter works on the ETL principle and can be deployed using the Helm Chart into the cluster. To configure it we need Port credentials.
Click on Complete Setup at the top right-hand corner.

Copy the code and paste it into your CLI with the current context set to the target cluster.
Check the logs. If everything is fine, you will see similar logs:

Finally, you will be able to see all the ingested entities in the software catalog section.

Summary
In this blog post, we have discussed what Port is and how we can leverage it to set up an IDP. We saw how Port supports most of the platform engineering principles. We also discussed the core components of Port and the use cases around it and the wide range of out-of-the-box integrations offered.
Furthermore, we have created a software catalog for Kubernetes and got to know how we can integrate it into the Port. However, platform engineering is more complicated in real-world scenarios. For advice and consultation, you can connect with our platform engineering experts.
I hope this article was informative to you. I would like to hear your thoughts on this post. If you wish to share your opinion about this article, let’s connect and start a conversation on LinkedIn.
