In Part 3 of Argo Rollouts, we have seen the canary deployment strategy with analysis and deployed a sample app for the same using the Argo Rollout controller in the Kubernetes cluster. In this hands-on lab, we are going to explore the canary deployment strategy with traffic management using the Nginx controller via deploying a sample app using the Argo Rollouts.
Traffic Management in Kubernetes
When we talk about progressive delivery and a strategy like canary deployment, traffic management becomes vital. The key here is to ensure that we’re able to shift traffic to respective versions of the application correctly. We want the right set of users to receive the version that was intended for them. Further, the data plane should be intelligent enough to route incoming traffic to the intended version.
Traffic routing can be achieved using multiple methods, some of the common ones being:
- Raw routing: you mention a percentage, and that amount of users will be routed to the new version while the rest would be sent to the stable version.
- Header-based routing: Route traffic based on certain headers sent as part of a request
When it comes to Kubernetes, it doesn’t offer any traffic management capabilities. At the most, you can create a service object that will provide you with some features, but not all. That’s where service meshes come in. By using CRDs, service meshes add traffic management capabilities to Kubernetes.
Agro Rollouts come with multiple options for traffic management. It allows you to choose from a suite of service meshes. It modifies the service mesh to match the requirement of a rollout.
In this blog post, we’ll look into using Nginx Ingress to route traffic for our canary deployment.
Lab/hands-on of Argo Rollout with Traffic Management using Nginx Controller
If you do not have the K8s cluster readily available to do further labs, then we recommend going for the CloudYuga platform-based version of this blog post. Else, you can set up your own kind local cluster with the Nginx controller also deployed and follow along to execute the below commands against your kind cluster.
Clone the Argo Rollouts example GitHub repo or preferably, fork this repo:
git clone https://github.com/NiniiGit/argo-rollouts-example.git
Install Helm3 as it would be needed later during the demo
curl -fsSL -o get_helm.sh https://raw.githubusercontent.com/helm/helm/main/scripts/get-helm-3
chmod 700 get_helm.sh
./get_helm.sh
helm version
Installation of Argo Rollouts controller
Create the namespace for installation of the Argo Rollouts controller and Install the Argo Rollouts through the below command; more about the installation can be found here.
kubectl create namespace argo-rollouts
kubectl apply -n argo-rollouts -f https://github.com/argoproj/argo-rollouts/releases/latest/download/install.yaml
You will see that the controller and other components have been deployed. Wait for the pods to be in the Running state.
kubectl get all -n argo-rollouts
Install Argo Rollouts Kubectl plugin with curl for easy interaction with Rollout controller and resources.
curl -LO https://github.com/argoproj/argo-rollouts/releases/latest/download/kubectl-argo-rollouts-linux-amd64
chmod +x ./kubectl-argo-rollouts-linux-amd64
sudo mv ./kubectl-argo-rollouts-linux-amd64 /usr/local/bin/kubectl-argo-rollouts
kubectl argo rollouts version
Argo Rollouts comes with its own GUI as well that you can access with the below command:
kubectl argo rollouts dashboard
You would be presented with UI as shown below (currently, it won't show you anything since we are yet to deploy any Argo Rollouts based app)

Let's go ahead and deploy the sample app using the canary deployment strategy and traffic management using Nginx controller.
Canary Deployment And Traffic Management With Argo Rollouts
We would be configuring the Nginx controller and passing additional header values with our client requests, which would make sure that all our client requests would always route to the canary version of our sample Nginx service.
We have created a sample Nginx service wrapped up as a helm chart and available inside the folder argo-traffic-management-demo, which you will find in the cloned repo.
We will be running this demo in ic-demo namespace, so let’s create the same namespace
kubectl create ns ic-demo
Before deploying the helm chart, let's update the ingress controller hostname value in values.yaml.
You can use your favorite IDE to edit that argo-traffic-management-demo/values.yaml file.
Update the below entry:

Deploy the helm-chart, which will eventually create all the necessary Kubernetes objects in ic-demo namespace.
cd argo-rollouts-example
helm install demo-nginx -n ic-demo ./argo-traffic-management-demo
Verify the deployment status by running the following.
helm list -n ic-demo
Now, you can check the status of your rollouts using the following command:
kubectl argo rollouts get rollout demo-nginx -n ic-demo
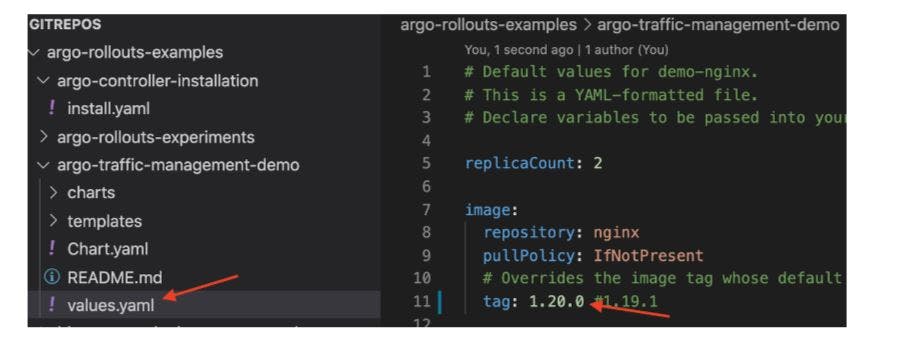
If you look at the above command output, you could see the rollout object has been created with the given replicas (1). Since this is the first revision, there will not be any canary ReplicaSet. Now you can update the image tag in values.yaml and run a helm upgrade to update the rollout object. Update the image tag from the existing 1.19.1 to 1.20.0 as shown below in argo-traffic-management-demo/values.yaml file :

Run a helm upgrade to update the rollout object
cd argo-rollouts-example
helm upgrade demo-nginx -n ic-demo ./argo-traffic-management-demo
Observe the rollout object status
kubectl argo rollouts get rollout demo-nginx -n ic-demo
You should be able to see something like the stable and canary sections. A new replica set has been created for the new canary pods. Open two terminal windows or one in a split view. In one of the terminals, run the below command, which will tail live logs of pods running as canary service.
kubectl logs -f <canary-pod-name> -n ic-demo
Replace with your canary pod name.
In the other terminal, access the app URL using the exposed ingress URL and passing the custom header values.
curl -H "canary: yep" -IL http://<your-host-name>/helloe/jsbdsdsd.html
Replace with the hostname of the URL.
You would be able to see our curl request (which we are mimicking as a client request) is always landing on our canary version of service only as shown below screenshot:

Promote the rollout object after manual verification.
kubectl argo rollouts promote demo-nginx -n ic-demo
This way, we can use Nginx-ingress as a traffic management tool in Argo Rollouts for deploying applications. Now let's delete this test setup.
helm delete demo-nginx -n ic-demo
Conclusion
In this post, we saw how we can add traffic management capabilities to Argo Rollouts using Nginx ingress. Achieving canary deployment using fine grained traffic management capabilities with Argo Rollouts is simple and importantly provides much better-automated control on rolling out a new version of your application.
What Next?
That brings us to the end of the 4 part series around Progressive Delivery with Argo Rollouts. We explored the basics of deployment strategies followed by hands-on examples of using blue-green & canary rollouts. We also looked into complex concepts like Analysis with canary deployments and finally ended with traffic management using Nginx Ingress.
You can find all the parts of this Argo Rollouts Series below:
- Part 1: Progressive Delivery with Argo Rollouts: Blue Green Deployment
- Part 2: Progressive Delivery with Argo Rollouts: Canary Deployment
- Part 3: Progressive Delivery with Argo Rollouts: Canary with Analysis
- Part 4: Progressive Delivery with Argo Rollouts: Canary Deployment with Traffic Management
I hope you found this post informative and engaging. I’d love to hear your thoughts on this post, so start a conversation on Twitter or LinkedIn :) Looking for help with building your DevOps strategy or want to outsource DevOps to the experts? learn why so many startups & enterprises consider us as one of the best DevOps consulting & services companies.
